RANGER Basic Dog Doors


RANGER Basic Dog Doors
Written Instructions
The RANGER Basic pet door is intended foradvanced DIYers and construction experts. Its essentials-only design gives maximum flexibility to the installer to incorporate into a wide variety of projects.
Because of this wide flexibility, this document can only give rough guidelines for installation rather than detailed, step-by-step instructions. If you have questions, please don’t hesitate to contact us.
Introduction
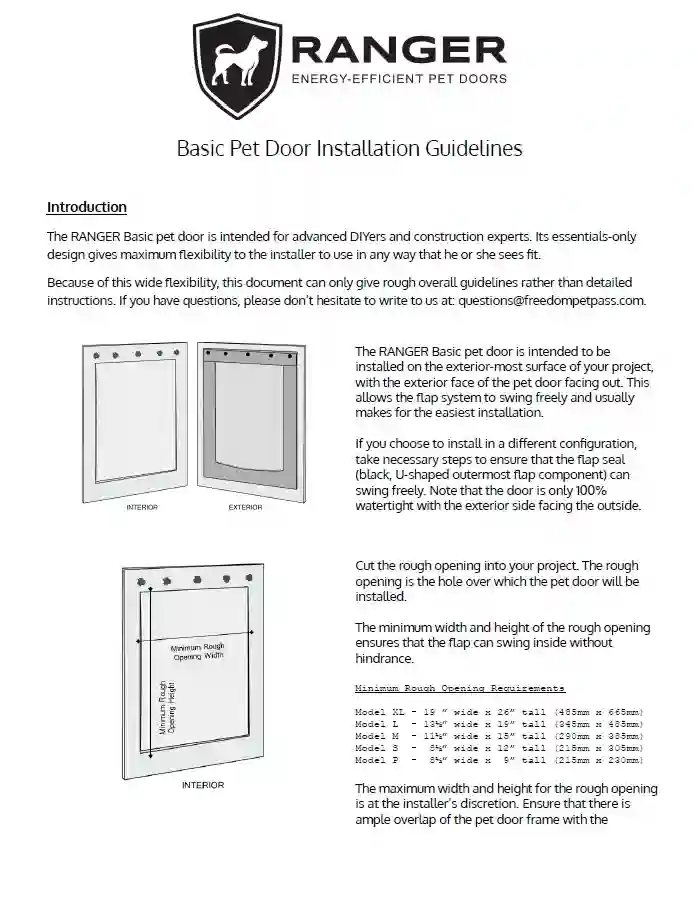
The RANGER Basic pet door is intended to be installed on the exterior-most surface of your project with the exterior face of the pet door facing out. This allows the flap system to swing freely and usually makes for the easiest installation.
If you choose to install in a different configuration, take necessary steps to ensure that the flap seal (black, U-shaped outermost flap component) can swing freely. Note that the door is only 100% watertight with the exterior side facing the outside.
1. Cut Rough Opening
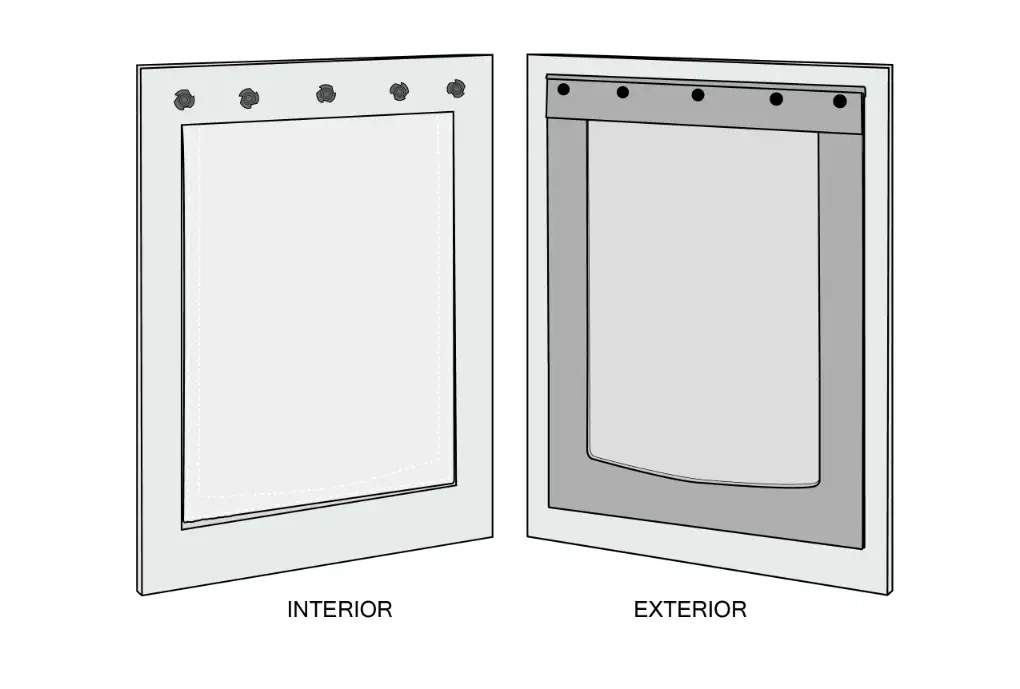
Cut the rough opening into your project. The rough opening is the hole over which the pet door will be installed.
The minimum width and height of the rough opening ensures that the flap can swing inside without hindrance.
|
Model XL |
19” wide x 26” tall (485 mm x 665 mm) |
|
Model L |
13-1/2” wide x 19” tall (345 mm x 485 mm) |
|
Model M |
11-1/2” wide x 15” tall (290 mm x 385 mm) |
|
Model S |
8-1/2” wide x 12” tall (215 mm x 305 mm) |
The maximum width and height for the rough opening is at the installer’s discretion. Ensure that there is ample overlap of the pet door frame with the surface on which it will be mounted for secure attachment (see last step).
2. Add Construction Adhesive (optional)
Prior to attaching the Basic door over the rough opening, consider adding a bead of construction adhesive or exterior-grade silicone to the back of the frame of the door. This will ensure a good, weatherproof seal.
This optional step may not make sense for every situation and should be done at the installer’s discretion.
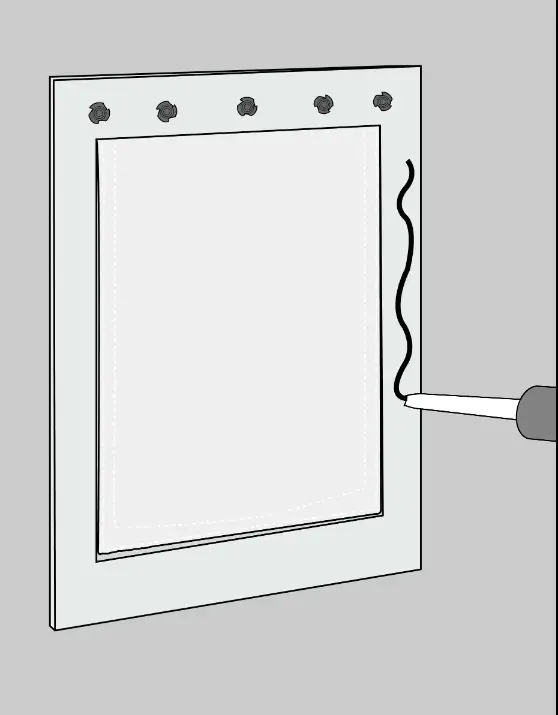
3. Attach Pet Door
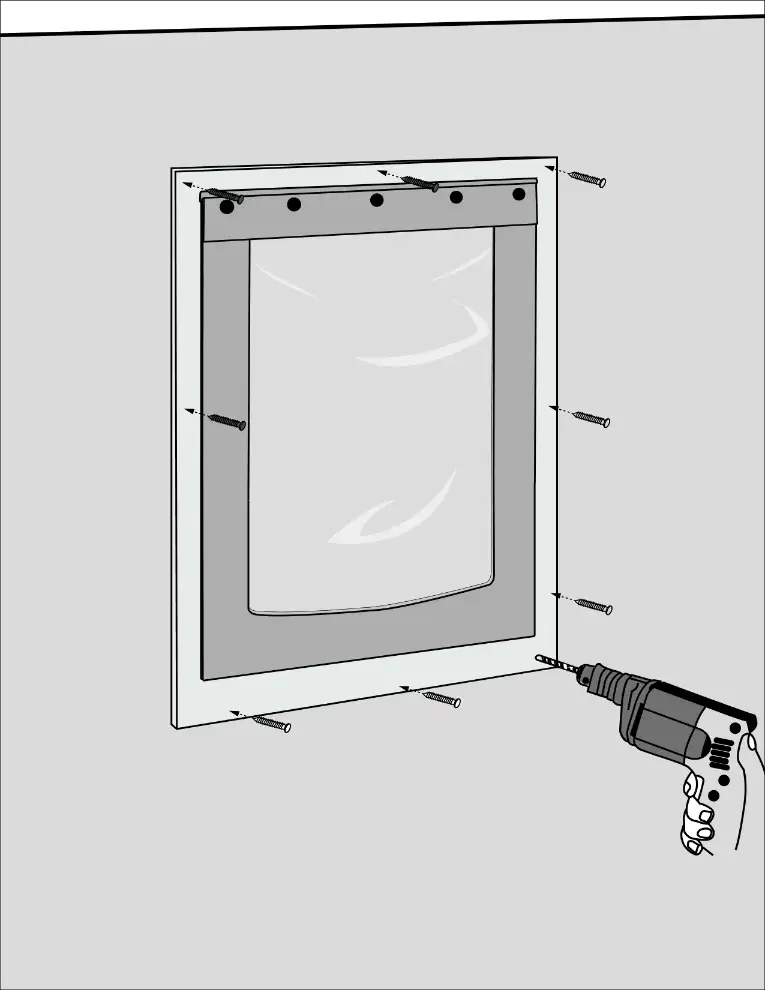
The Basic pet door can be secured to the project in any way the installer sees fit.
The easiest way to attach the Basic pet door to your project is by screwing through the pet door frame into the project substrate.
Prior to attachment, ensure that the flap system can open and close freely without getting caught on the rough opening.
Use a sufficient number of exterior-grade fasteners to achieve a sturdy attachment.
After installation, ensure that there are no sharp edges, protruding fasteners, or other hazards that could harm pets using the door.
Frequently Asked Questions
30-ish Day Return Policy
If you are not 100% satisfied with your purchase, you may return the item for a refund.
We’re not sticklers for timeline, but please try to make your decision within a month or so of delivery.
Warranty
RANGER Pet Doors come with a 3-year limited warranty against malfunction due to manufacturing or material defects.
Lifetime Support
RANGER Pet Doors are designed to be the last pet door you ever have to buy.
We will always support owners of our pet doors, regardless of when they were bought or from whom. We will always maintain stocks of replacement parts, even for our oldest doors.
If you ever have any questions about your pet door, even if it’s really old or you’re not the original owner, please don’t hesitate to reach out and contact us.
Danny Aldridge (verified owner) –
I ordered the XL version, and it worked great for the heated dog house I built for my mastiffs.
Mike (verified owner) –
Amazing doors! We are so incredibly happy with our Freedom Pet Door. We have been trying to find a pet door solution for a while. I found Freedom Pet Pass doors and was skeptical of their claims. We live in a high wind area of Montana and the only option for us to use a doggie door faces the direction the wind comes from. We were obviously concerned about energy loss and a draft that would be expected with a typical doggie door.
After reading the reviews, including some from people in similar wind situations as ours, we decided to try it.
We read the installation instructions and watched the installation videos. We found them to be very informative and helpful. I would consider myself average when it comes to diy. The instructions/videos were broken up into segments which was helpful as we were installing. We found the video showing how to seal the door using caulk particularly helpful.
The door had been in for a few days and we are so happy! I would recommend this door to anyone who is concerned about weather or energy loss.
PROS: the design is excellent. I found a video of the “candle test” and was skeptical. However I can personally attest to it’s legitimacy. Zero wind is getting through the pet pass door.
The installation videos are EXCELLENT. I would highly recommend watching them entirely before you begin the process and then have the video open on each step as you go. I found this to be very helpful.
CONS: The first one isn’t even really a “con” but more of a warning. My advice would be to get the door best fitted for your dog. They have a pretty sweet sizing chart and I suggest you stick to it. (Of course if you have big and small dogs, get a door that will fit the largest dog.) I purchased a medium size door even though my dogs are smaller (miniature schnauzers). My thought was it would give us options for the future if we decided on a different breed. The problem with my logic is that the magnets on the Freedom Pet Pass Door are strong and so my dogs have a little trouble pushing the door open. This is amplified when the wind is blowing and they are going out the door. The smaller dog will sometimes try to push the door and feel the wind pushing back and stop and wait for us to let him out. We’ve only had it a couple of days, so I’m hoping his confidence grows.
Additionally, there was a couple times with very high winds that the flap didn’t seal all the way after the dogs came through. The wind kept the door just a little ajar. We immediately felt the draft and closed it. This could have more to do with my dogs being timid so far as they use the door. I believe as they gain confidence and “burst” through the door, the door will snap back more rapidly to seal the magnets.
Lastly, I didn’t read this before I purchased the door, but they do advise that you don’t use the locking panel to keep your dogs outside. This makes total sense as the security panel is not visible to dogs that are on the outside. You don’t want your puppy barreling though what they have come to expect is an open door and hurt themselves by running into the closed panel. We do, however, like our dogs to be outside on summer days (plenty of water and shade) while we work. If left up to them, they would be inside laying on the couch, but we want them to get their exercise running in the yard. I wish there was an optional panel for the outside as well. That would be my only suggestion for this system. We will probably just block their access to the door altogether on days we want them to stay outside.
Overall, we are so extremely happy with the door and would recommend it to anyone! Thank you Freedom Pet Pass!
Reginald E Smith (verified owner) –
I bought the model s used
Absolutely!! Amazing!!ROLLS ROYCE of doors!
I thought a dog door was a dog not true at all,if you live in a cold windy climate like upstate N.Y.
Purchase one you won’t regret it !
Definitely Absolutely a energy saver!
Flap seals tight even with the wind blowing hard!
Wow unbelievable!
Very unique design!
5 star ✋s down!